Arduino Nano programming in 2023, obsolescence be damned

I’m working on a little PCB for a robotics competition. It is used by the competition volunteers to time races between competing robots. Cool!

The design is based on an Arduino Nano to keep things easy…. in theory. In practice, I couldn’t get a modern (or even outdated) version of the Arduino IDE to program this thing. It’s a common theme in the forums. Anyway, as a service to my future self and any other future selves, here is how I got it working, despite Arduino’s lack of care or interest in supporting their products:

  1. Abandon using the USB interface. I tried this on 3 operating systems & 3 versions of the Arduino IDE, I could not get it to work. According to legend, sometimes it may start working after a lot of wasted time. In these rare cases, nobody seems to know how they did it.
  2. Use an ISP programmer. Hopefully yours is not the Olimex avr-isp-mk2. This is what I have, and it is effectively not supported by Arduino since version 1.5.x
  3. For Linux users with the Olimex programmer:
    1. Download the source for avrdude (get version 6.4 from http://download.savannah.gnu.org/releases/avrdude/)
    2. Extract the source archive, enter the directory
    3. Apply this patch https://www.olimex.com/Products/AVR/Programmers/AVR-ISP-MK2/resources/endpointdetect_pass1.patch
      1. cd to avrdude[…] folder
      2. patch -p0 < endpointdetect_pass1.patch
    4. ./configure && make all
  4. I recommend using the legacy 1.8.x IDE from https://wiki-content.arduino.cc/en/software. Download that, extract the archive. Newer versions of the IDE seem to hang indefinitely on a vague loading screen.
  5. Applies to Olimex programmer: Find the avrdude executable included in the arduino archive. Replace it with your new compiled one
    1. find . -name ‘avrdude’
    2. it should be at hardware/tools/avr/bin
    3. use the ln command to link your compiled avrdude into this location. This replaces their older incompatible version with your newly patched binary
      1. ln -sf /path/to/your/src/avrdude/avrdude ./hardware/tools/avr/bin/avrdude
  6. You can now run ./arduino from the Arduino legacy archive – this was enough to get it working on my end
  7. In the Arduino IDE, upload the sketch by selecting your programmer from ‘Tools > Programmer’, and upload the sketch by using ‘Sketch > Upload using programmer’

Other things you may have to do on Linux systems: install a udev rule for the Olimex programmer, and add yourself to the appropriate group (probably dialout). See Olimex link below.

If you are on Windows with the Olimex interface – compiling will be different to some degree, but ultimately you still replace the avrdude executable to fix the issue.

If you are also stuck with the Olimex interface (why am I still using this thing??), there’s much more info here: https://www.olimex.com/forum/index.php?topic=5358.0

Hacking Dollar-Store Bluetooth Devices (The Kindness of Strangers) part 2

This is a continuation of “Hacking Dollar-Store Bluetooth Devices (The Kindness of Strangers) part 1”

After putting the EEPROM programming document (rda5871_progguide) through google translate, I was able to discern the format of this mysterious binary dump I had created – I created a simple program to parse the Saleae log file (saleae_log) into one contiguous binary image (binary_image – extension is just to get around wordpress, it’s binary) and parse the info header as well as  some of the configuration data (hopefully).

However, the data I got back was pretty trivial:

Parsing info header…
**************
Chip ID: 0x5873
Version: 6.4
PSKey Length: 532
Data Length: 6912
PSKey: SYS_CONFIG_ID_NULL
Length: 0
Data: {}

This at least provided a sanity check against the info header format – the Chip ID matches what is laid out in the guide.  But, none of the datasheet’s “PSKey” information located at 0x88 seems to be used – just 532 bytes of “SYS_CONFIG_ID_NULL” and zero-length data blocks.  As well, the ISR code regions described seem to reside well out of the memory range of the binary dump – e.g. 0x80006880 – so it appears I am no further along in the binary image, pending further ingenuity…


But then I noticed some clearly labelled serial connections!

20160911_115417
I was able to squeeze in a tiny terminal header to break out the TX/RX solder pads

20160911_120627
Pro tip – you can pop the Atmel IC out of an arduino board, and you have a simple USB <-> TTL RS232 bridge

20160911_125657


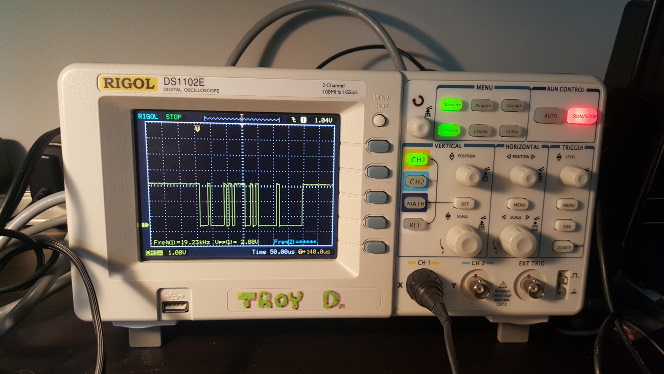
I was able to discern from my ‘scope that the data was transmitting at a line discipline of 115200 Baud 8N1 – however, the data that it spat back at me was indecipherable.  Consistent, but gibberish.  I had some hopes that it was unicode / chinese characters, but this was quickly ruled out (unless this serial prompt also uses arabic…).  If I had to guess, this is some binary debug and/or manufacturing automation output.  Oh well.

I also noticed that the device would pair to my PC as a USB keyboard – it ends up sending a “Volume up” keystroke and a “Enter” keystroke between the two buttons.  I was hopeful that the EEPROM image would contain the keycodes for these, allowing us to change it’s behaviour, but I was unable to find such.

My next step will be to selectively write some of the EEPROM data & (hopefully) change the device’s name – stay tuned!

Halloween 2014 – a functioning gameboy

For Halloween this year, I decided to step up my costume game and make a fully functioning gameboy costume:

Video:

A ton of people who saw the costume wouldn’t believe it worked until they pushed a button….. but the reaction was always priceless


Click ‘Continue Reading’ to see how the magic works!

Read more “Halloween 2014 – a functioning gameboy”

Gameduino2 test game

Hello internet, I recently received my Gameduino2 via kickstarter and dreamt up a quick demo – tilting the screen moves the ball around (with realistic-ish physics), and keeping it on the “path” longer earns more points:

This demo doesn’t even touch the Gameduino2’s capabilities – just a fun proof of concept.  Maybe someone can build off of it?

Anyways, code is available at https://github.com/trdenton/gameduino2-ballgame, including a pre-compiled .elf file for the arduino Uno.  I am using the Eclipse Arduino plugin from http://baeyens.it/eclipse, and have included the project files.  It should still work in the arduino IDE if you remove the eclipse project files – Enjoy!